Now that we have setup our ruby environment on Linux, we are going to create a setup for testing purposes by adding some useful gems.
For that, we will use a feature from rvm called gemsets. A gemset is an independent setup for your environment. That means you can have many environments with a different set of gems (hence the name) installed independently on each one (even with different ruby versions).
Usually, when working on a project, you would create a gemset specific for that project, but in this case, we are going to create a gemset for practicing tdd, doing katas, coderetreats, etc. If you plan to use rvm in a serious project (which you should), please read first about rvm best practices.
A brief introduction to gemsets
For each version of ruby, rvm creates two gemsets, the default, empty gemset and the global gemset. You can list your gemsets with:
Create a tdd gemset:
You can install gems for your current gemset using:
For that, we will use a feature from rvm called gemsets. A gemset is an independent setup for your environment. That means you can have many environments with a different set of gems (hence the name) installed independently on each one (even with different ruby versions).
Usually, when working on a project, you would create a gemset specific for that project, but in this case, we are going to create a gemset for practicing tdd, doing katas, coderetreats, etc. If you plan to use rvm in a serious project (which you should), please read first about rvm best practices.
A brief introduction to gemsets
For each version of ruby, rvm creates two gemsets, the default, empty gemset and the global gemset. You can list your gemsets with:
rvm gemset listGems that are installed to the @global gemset are shared to all other gemset for that ruby. We won’t install anything here. Instead we will create our own gemset and put everything there.
Create a tdd gemset:
rvm gemset create tddSwitch to that gemset:
rvm use gemset 1.9.2@tddIf you want to make this your default gemset (the one that will be loaded by default) you can do that by doing:
rvm use gemset 1.9.2@tdd –defaultVerify you are on the new gemset:
rvm gemset nameYou should get:
tddGems for testing that rock
You can install gems for your current gemset using:
gem install
To do unit testing in ruby, rspec is a great choice.
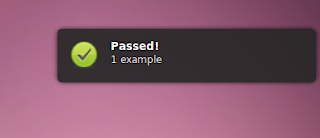
We’ll add a nice gem called test_notifier. This is the topping of the cake. It will notify your OS with the result of your tests.
In order to it on GNOME, we will need to install libnotify:
gem install rspec
To start using it, create an rspec file, like example_spec.rb inside a spec folder on the root of your project:
describe "something" do
  it "does something that passes" do
    5.should eq(5)
  end
You can then execute it by running:
rspec spec/
For a nicer, colored output, pass in the –colour flag to rspec
rspec spec/ –colour
Or create a .rspec config file on your project root (or in your home dir if you want to always use it), to tell rspec to use the colored output by default
echo “–colour” >> .rspec
Excecuting rspec by hand all the time gets boring quickly, and it turns out computers are quite good at doing tasks repeteadly, so you can instead use autotest, a cool gem from the ZenTest suite that will automagically execute your tests when you save your files.
gem install autotest
Execute it from your project root.
autotest –style rspec2 –quiet
The –style flag tells autotest to look for rspec kind of tests. The –quiet flag removes a bit of noise you probably don’t care about.
If you have created the .rpec file on your project root, you can omit the style flag and autotest will still find the tests.
If you are really lazy like me, you can instruct autotest to be quiet by default by creating a .autotest file in your home:autotest –quiet
echo “Autotest.options[:quiet] = true” >> ~/.autotestSo whatever option you want to use, let’s try it. Modify your rspec file and save it. Awesome, isn’t it? But wait, there is more!
We’ll add a nice gem called test_notifier. This is the topping of the cake. It will notify your OS with the result of your tests.
In order to it on GNOME, we will need to install libnotify:
sudo apt-get install libnotify-bin
gem install test_notifierConfigure autotest to use test_notifier:
echo ‘require “test_notifier/runner/autotest”’ >> .autotestOr add the following to your rspec/spec_helper file if you want to use it directly with rspec:
require “test_notifier/runner/spec”Now you should get a nice notification when you save your file.
